Tutoriels Backend
Routing with Angular
Routing allows you to manage the URLs and routes of a web application.
In this tutorial, we will integrate routing using Angular 20.1.3
Angular has the @angular/router library, which makes it easy and quick to implement efficient navigation within an Angular application.


If you don't have time to read this entire guide,
download it now
How to do it?
To achieve this routing, here is a summary of what we are going to do
- Before You Begin
What is routing?
With a little example from life - Creating our Angular project
We will use an existing project containing the essential features.
The project was generated with Angular CLI. - Project structure
Before integrating our modifications we need to choose a structure. - Project Initialization
Using angular CLI - Child Routes
How to handle more complex routes
- Perform the Tests
Perform unit tests. - Source code
For those of you in a hurry, the complete code of the project is available on Github.
You just need to go to the following address
https://github.com/ganatan/angular-react-routing
Before you start
First an example to try to understand the theory.
You probably like movies.
It's the weekend and you're deciding between two movies.
At least 2 films interest you or rather interest your children (it's up to you to see who has the remote control).
A computer, a smartphone or a tablet and Wi-Fi, and you're ready to go.
Wikipedia becomes our friend and gives us a summary.
It's quick and it's simple.
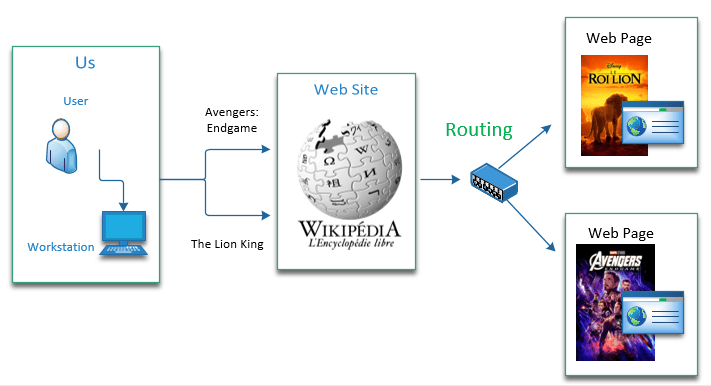
On a technical level, let's see what this looks like in images.
Routing with Wikipedia

In the end it all depends on how you see life.
But Wikipedia becomes a station master who will tell you where to go.
And it's better to have a rather strong station master since you won't be the only one asking him questions.
Is life a comedy or a tragedy?

Now some explanations.
A website is made up of a multitude of pages.
These pages are written using HTML language in particular.
HTML stands for HyperText Markup Language .
Hypertext is the technology that will allow a page to be linked to other pages via hyperlinks .
Routing is the mechanism that allows you to navigate from one page to another in our example.
For example if you type these two urls in your browser.
Depending on the movie name given in the URL, the Wikipedia web application will determine what processing to perform.
This processing will display the web page corresponding to the requested film (here The_Lion_King or Avengers:_Endgame ).
This is called Routing .
If we had to make a comparison, it's a bit like an air traffic controller or a station master .
Without routing we no longer know where we are going.
So you will have understood that without routing there is no web application.
Which could give this.

This operating principle being omnipresent in the use of a website, we must apply it as quickly as possible in any web project.
So we are going to implement this mechanism in our Angular project.
Warning
So obviously the laughing is over.
The technical part begins.
If you don't know anything about Angular, it's best to hang on.
That's why I'm detailing the whole process for you.
And by the way I give you the complete code to implement as you go.
Otherwise AI or not AI where is the real Wild Bill Kelso
my name is Buffalo bill kelso when it's war i make war

Creating the Angular project
To be able to continue this tutorial we obviously need to have certain elements
- Node.js : The JavaScript platform
- Git : The version control software.
- Angular CLI : The tool provided by Angular.
- Visual Studio Code : A code editor.
You can check out the following tutorial which explains in detail how to do it
In this tutorial we will use an existing project whose characteristics are
- Generated with Angular CLI
# Create a demo directory (the name is arbitrary here)
mkdir demo

# Go to this directory
cd demo

# Get the source code on your workstation
git clone https://github.com/ganatan/angular-react-starter

# Go to the directory that was created
cd angular-react-starter
cd frontend-angular

# Run the dependencies (or libraries) installation
npm install

# Run the program
npm run start

# Check its operation by launching the command in your browser
http://localhost:4200/
Project structure
When creating the project with Angular CLI the structure created by default is the following
Noticed
The environments directory is no longer automatically generated since Angular 15.
I added it manually in the previous tutorial Getting Started with Angular .
Which gives a basic, 100% Angular tree like this one.
|-- src/
    |-- app
    |-- assets
    |-- environments
package.json
I suggest that you adapt the proposed tree structure.
The choice I make is arbitrary, which means I do what I want.
But don't take this for granted, your structure can take any other form.
This choice will nevertheless be followed in the following tutorials.
So I'll explain it to you.
- core will group together the elements that will be found in all projects.
- features will group together application-specific elements.
- shared will group reusable components.
|-- app
    |-- core
    |-- features
        |-- about
        |-- contact
        |-- home
        |-- login
        |-- not-found
        |-- signup
    |-- shared
|-- assets
|-- environments
About architecture I recommend the video of this excellent youtuber
Gaëtan Rouziès
Who gives us his thoughts here
https://www.youtube.com/watch?v=JUFTGXUjnuE
A different opinion

Initialization
A quick overview before looking at the technical details
Angular offers an angular@routeur library which allows you to manage routing.
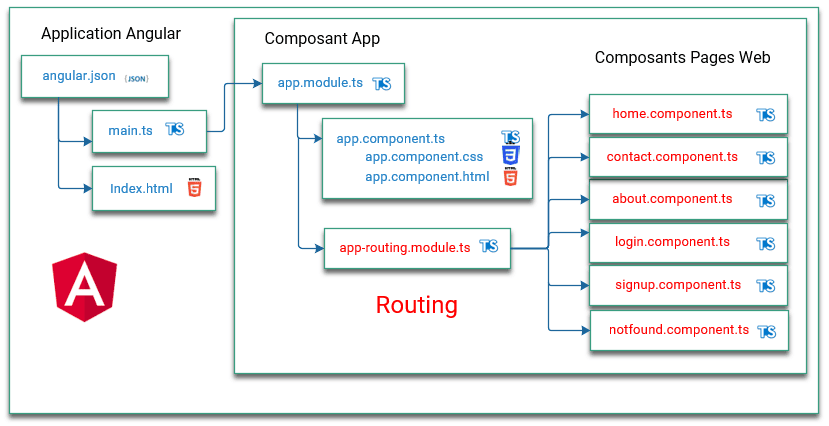
In versions prior to Angular 17 routing was handled as follows.
The angular@routeur library was imported into a module dedicated to routing.
This module was named app-routing.module.ts.
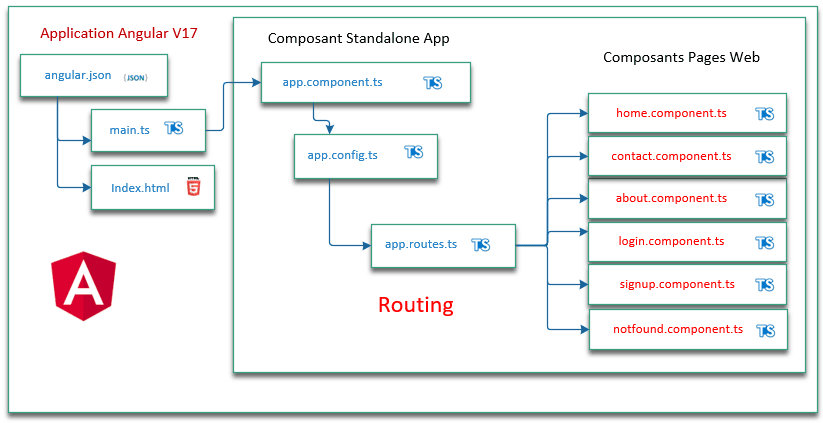
Since version 17 routing is implicit when creating the project with Angular CLI.
Routing is thus managed via 3 basic files.
- app.ts
- app.config.ts
- app.routes.ts
The following diagram will explain how it is handled with version 17.
Throughout this tutorial we will try to use the commands that angular-cli offers to automatically generate the necessary source code.
First we will create six components that will be used in routing.
A component will correspond to a web page.
These are six classic web pages that are found on any website.
- Home
- Contact
- About
- Login
- Signup
- NotFound
So two diagrams to recap what we are going to do with version 20
and its comparison with versions 16 and earlier.
Routing with Angular 20

Routing with Angular 16

We will use angular CLI for this.
The following tutorial will give you information about Angular CLI commands
https://www.ganatan.com/tutorials/demarrer-avec-angular-cli
Let's run the following commands.
ng g corresponds to the ng generate command
# Creating new components (method 1)
ng generate component features/contact
ng generate component features/login
ng generate component features/signup
ng generate component features/home
ng generate component features/about
ng generate component features/not-found

# Creating new components (method 2)
ng g c features/contact
ng g c features/login
ng g c features/signup
ng g c features/home
ng g c features/about
ng g c features/not-found
The features directory is created by the executed command.
All files related to each component are created automatically by angular CLI.
For example for the Home component 4 files are created
- home.css (CSS code dedicated to design)
- home.html (HTML code)
- home.spec.ts (component unit test code)
- home.ts (typescript logical part of our component)
Then you need to modify the following files
- app-routes.ts
- styles.css
- app.html
- app.css
- app.ts
- app.spec.ts
This will allow the desired routing and called components to be processed.
import { Routes } from '@angular/router';

import { Home } from './features/home/home';

import { Login } from './features/login/login';
import { Signup } from './features/signup/signup';
import { NotFound } from './features/not-found/not-found';

import { About } from './features/about/about';
import { Contact } from './features/contact/contact';

export const routes: Routes = [
    { path: '', component: Home, },

    { path: 'login', component: Login },
    { path: 'signup', component: Signup },

    { path: 'about', component: About },
    { path: 'contact', component: Contact },

    { path: '**', component: NotFound }
];body {
color: black;
font-weight: 400;
}In the AppComponent component we will take care to add the router-outlet element to the app.component.html file. It will tell the router where to display the routed graphical elements. The routerLink element will create the link to the desired pages.
<div class="app">
  <header>
    <section>
      <h1>{{ title }}</h1>
    </section>
    <nav>
      <h2>3 Links with Routes</h2>
      <ul>
        <li><a routerLink="/">Home</a></li>
        <li><a routerLink="/login">Login</a></li>
        <li><a routerLink="/signup">Signup</a></li>
      </ul>
      <h3>2 Links with Child Routes</h3>
      <ul>
        <li><a routerLink="/about">About</a></li>
        <li><a routerLink="/contact">Contact</a></li>
      </ul>
    </nav>
  </header>

  <main>
    <h4>Routes Result</h4>
    <router-outlet></router-outlet>
  </main>

  <footer>
    <a href="{{ footerUrl }}">{{ footerLink }}</a>
  </footer>

</div>h1 {
color: blue;
}
.app {
font-family: Arial, Helvetica, sans-serif;
max-width: 500px;
margin: auto;
}
import { Component } from '@angular/core';
import { CommonModule } from '@angular/common';
import { RouterLink, RouterOutlet } from '@angular/router';

@Component({
  selector: 'app-root',
  imports: [CommonModule, RouterLink, RouterOutlet],
  templateUrl: './app.html',
  styleUrl: './app.css'
})
export class App {
  title = 'angular-routing';
  footerUrl = 'https://www.ganatan.com';
  footerLink = 'www.ganatan.com';
}
Routing works
After all these modifications let's check that it works.
We run the launch script and test the result in the browser.
# Exécutez l'application
npm run start

# Testez l'application dans votre navigateur
http://localhost:4200
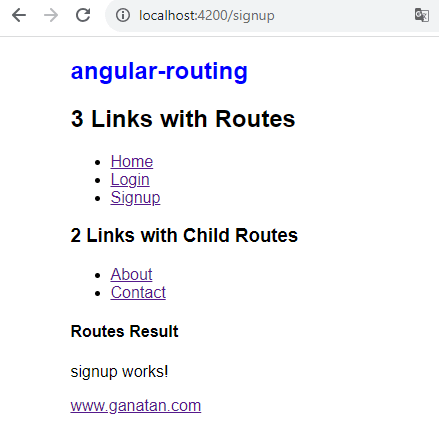
The program works, test the routing by clicking on the different links.
We agree it's not very pretty.
But we did it quickly, using very simple HTML and CSS.
We'll refine all of this later using Bootstrap in a later tutorial.
Waiting for the result in pictures.

For the tests to work
We need to add the RouterTestingModule module to the unit tests of the App component.
This addition is made at the level of the corresponding test file app.component.spec.ts .
import { TestBed } from '@angular/core/testing';
import { App } from './app';
import { ActivatedRoute } from '@angular/router';

describe('App', () => {
  beforeEach(async () => {
    await TestBed.configureTestingModule({
      imports: [App],
      providers: [
        {
          provide: ActivatedRoute,
          useValue: {}
        }
      ]
    }).compileComponents();
  });

  it('should create the app', () => {
    const fixture = TestBed.createComponent(App);
    const app = fixture.componentInstance;
    expect(app).toBeTruthy();
  });

  it('should render title', () => {
    const fixture = TestBed.createComponent(App);
    fixture.detectChanges();
    const compiled = fixture.nativeElement as HTMLElement;
    expect(compiled.querySelector('h1')?.textContent).toContain('angular-routing');
  });
});
Child Routes
To handle more complex routes, for example routing from the contact component, we need to address the management of Child routes or Nesting Routes.
This question is raised in the documentation
https://angular.io/guide/router#child-route-configuration
We will add five components that will be accessible from the Contact and About components.
- mailing (for contact)
- mapping (for contact)
- website (for contact)
- skill (for about)
- experience (for about)
# Addition of the three components for contact
ng generate component features/contact/mailing
ng generate component features/contact/mapping
ng generate component features/contact/website


# Adding the two components for about
ng generate component features/about/skill
ng generate component features/about/experience
4 files are automatically created for each component for example for mailing
- mailing.css
- mailing.html
- mailing.spec.ts
- mailing.ts
We still need to modify the routing
- contact.html
- contact.ts
- contact.spec.ts
- about.html
- about.ts
- about.spec.ts
- app-routes.ts
<div>
    <p>contact works!</p>
    <ul>
      <li><a routerLink="/contact/mailing">Mailing</a></li>
      <li><a routerLink="/contact/mapping">Mapping</a></li>
      <li><a routerLink="/contact/website">Website</a></li>
    </ul>
    <h4>Child Routes Result</h4>
    <router-outlet></router-outlet>
</div>import { Component } from '@angular/core';
import { CommonModule } from '@angular/common';
import { RouterLink, RouterOutlet } from '@angular/router';
@Component({
selector: 'app-contact',
imports: [CommonModule, RouterLink, RouterOutlet],
templateUrl: './contact.html',
styleUrl: './contact.css'
})
export class Contact {
}<div>
<p>about works!</p>
<ul>
<li><a routerLink="/about/experience">experience</a></li>
<li><a routerLink="/about/skill">skill</a></li>
</ul>
<h4>Child Routes Result</h4>
<router-outlet></router-outlet>
</div>import { Component } from '@angular/core';
import { CommonModule } from '@angular/common';
import { RouterLink, RouterOutlet } from '@angular/router';
@Component({
selector: 'app-about',
imports: [CommonModule, RouterLink, RouterOutlet],
templateUrl: './about.html',
styleUrl: './about.css'
})
export class About {
}import { Routes } from '@angular/router';
import { Home } from './features/home/home';
import { Login } from './features/login/login';
import { Signup } from './features/signup/signup';
import { NotFound } from './features/not-found/not-found';
import { About } from './features/about/about';
import { Contact } from './features/contact/contact';
import { Experience } from './features/about/experience/experience';
import { Skill } from './features/about/skill/skill';
import { Mailing } from './features/contact/mailing/mailing';
import { Mapping } from './features/contact/mapping/mapping';
import { Website } from './features/contact/website/website';
export const routes: Routes = [
{ path: '', component: Home, },
{ path: 'login', component: Login },
{ path: 'signup', component: Signup },
{
path: 'about', component: About,
children: [
{ path: '', component: Experience },
{ path: 'experience', component: Experience },
{ path: 'skill', component: Skill },
],
},
{
path: 'contact', component: Contact,
children: [
{ path: '', component: Mailing },
{ path: 'mailing', component: Mailing },
{ path: 'mapping', component: Mapping },
{ path: 'website', component: Website },
],
},
{ path: '**', component: NotFound }
];import { ComponentFixture, TestBed } from '@angular/core/testing';
import { Contact } from './contact';
import { ActivatedRoute } from '@angular/router';
describe('Contact', () => {
let component: Contact;
let fixture: ComponentFixture<Contact>;
beforeEach(async () => {
await TestBed.configureTestingModule({
imports: [Contact],
providers: [
{
provide: ActivatedRoute,
useValue: {}
}
]
})
.compileComponents();
fixture = TestBed.createComponent(Contact);
component = fixture.componentInstance;
fixture.detectChanges();
});
it('should create', () => {
expect(component).toBeTruthy();
});
});
import { ComponentFixture, TestBed } from '@angular/core/testing';

import { About } from './about';
import { ActivatedRoute } from '@angular/router';

describe('About', () => {
  let component: About;
  let fixture: ComponentFixture<About>;

  beforeEach(async () => {
    await TestBed.configureTestingModule({
      imports: [About],
      providers: [
        {
          provide: ActivatedRoute,
          useValue: {}
        }
      ]
    }).compileComponents();

    fixture = TestBed.createComponent(About);
    component = fixture.componentInstance;
    fixture.detectChanges();
  });

  it('should create', () => {
    expect(component).toBeTruthy();
  });
});
All that remains is to test the following scripts.
# Développement
npm run start
http://localhost:4200/

# Test de la page not-found
http://localhost:4200/lien-inconnu

# Tests
npm run test

# Production
npm run build
Source code
The source code used at the beginning of the tutorial is available on github
https://github.com/ganatan/angular-react-starter
The source code obtained at the end of this tutorial is available on github
https://github.com/ganatan/angular-react-routing
And if you liked it, the whole team is normally waiting for a star on github.
WTF no star on github!

The next step is Lazy Loading management.
It requires a complete tutorial which is at the following address
The following steps will get you a prototype application.
How to create a From scratch application?
Create your ganatan account
Download your complete guides for free
Démarrez avec angular CLI 
Gérez le routing 
Appliquez le Lazy loading 
Intégrez Bootstrap 
Utilisez Python avec Angular 
Utilisez Django avec Angular 
Utilisez Flask avec Angular 


