Tutoriels Backend
Modules with Angular
Angular is a Typescript framework that allows you to manage the notion of modules in two ways.
The first using ECMAScript 6 modules and the second using NgModules the Angular specific system.
These are two different but complementary functionalities, which allow us to better structure the code of our applications.
In this complete guide we will see how to use modules with Javascript and Angular NgModules .


If you don't have time to read this entire guide,
download it now
What we are going to do
- Origin of the modules
Why and how were modules integrated into the Javascript language? - Javascript and modules
How to use modules with javascript through a simple example. - Angular CLI and NgModules
How to use NgModules and integrate modules with Angular. - Creating a project from scratch
We will use Angular CLI to create a test application from scratch. - Using our prototype project
We will use an existing project containing the essential functionality.
The project was generated with Angular CLI.
It uses Routing and Lazy Loading.
It integrates the Bootstrap CSS Framework. - Routing and modules
How interpolation works. - Lazy loading and modules
How to manage Angular architecture using Angular CLI? - Perform the Tests
We will test our application through the unit and end-to-end tests built into Angular. - Source code
The full project code on github.
Origin of the modules
To answer this question, let's go back for a moment to the history of computing.
If you want to create web applications, you need to use a computer .
If you want to communicate with a computer the easiest way is to speak the same computer language (or Programming language in English).
JavaScript is one such language.
It is precisely a scripting programming language .
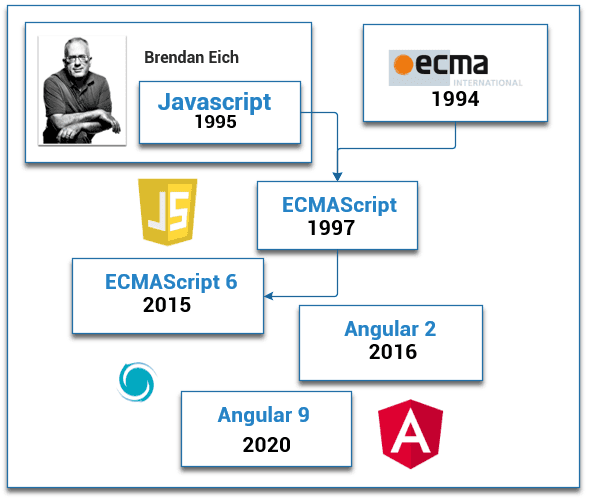
It was invented in 1995 by Brendan Eich to create interactive web pages.
A set of standards have been invented to handle scripting-type programming languages.
This standard is called ECMAScript .

ECMA ( European Computer Manufacturers Association ) is a standards organization.
It was created in 1961 to standardize computer systems in Europe.
It has been called Ecma International since 1994.
Over the years different versions of ECMAScript have been released, among these we could mention
- Version 1: 1997
- Version 2: 1998
- Version 6: 2015
- Version 7: 2016
- Version 10: 2019
The version that will interest us most is version 6.
It is more commonly referred to as ES6 or ES2015 .
- ES6 for ECMAScript Edition 6
- ES2015 for ECMAScript Edition 2015
The reason for our interest.
Introducing many concepts like promises, classes, iterators, generators.
And especially what this tutorial is about.
The modules
Why use modules?
Over the past decade, web applications have become increasingly complex.
The JavaScript programs that allow you to create these applications thus become more complex and therefore larger.
To overcome these difficulties, it was necessary to create a mechanism to divide JavaScript programs into several parts called modules .
With modules it could be summed up like this.

The advantages include:
- Structure our applications (several files instead of just one).
- Reuse code.
- Encapsulate code and make it easier to control.
- Manage dependencies more easily.
Using modules in JavaScript is based on two statements
- import
- export
In JavaScript, modules are simple files containing JavaScript code.
To activate an if module, simply write the import statement.
This syntax of ES6 modules corresponds to a construction standard recommended in the ECMAScript specifications of the JavaScript language.
A small example of code below.
# The code to export a module
export class AppComponent { example }

# The code to import a module
import { AppComponent } from './app.component';
Modules with javascript
What does a module written in javascript look like?
Let's take a very simple example of a Javascript program.
To make it work we need two things
- A code editor (I recommend Visual Studio Code)
- The Node.js javascript platform
To install these two tools you can follow this guide
https://www.ganatan.com/tutorials/demarrer-avec-angular
For the exercise, simply type the following code in an app.js file
function movieName(name) {
  console.log('Movie name :' + name);
}

function movieDirector(director) {
  console.log('Movie Director : ' + director);
}

function app() {
  movieName('Gladiator');
  movieDirector('Ridley Scott');
}

app();
To run it as it is a javascript file ( js extension ) type the following node command
- node app.js
Now some explanations.
The app function is called when the app.js script is executed.
This function in turn calls both the movieName and movieDirector functions.
At this stage the code is simple and quite practical.
Everything is contained in one file and easy to read.
But obviously as the modifications are made the number of functions will probably increase.
From two functions we could end up calling hundreds.
And as always, the day you're in a hurry it will be harder to find your way!

A javascript example with Modules
Now let's adapt our code to use this famous module system.
To do this, let's transform our app.js file into 3 separate files .
- app-modules.js
- movie-name.js
- movie-director.js
import { movieName } from './movie-name.js';
import { movieDirector } from './movie-director.js';

function app() {
  movieName('Gladiator');
  movieDirector('Ridley Scott');
}

app();function movieDirector(director) {
console.log('Movie Director : ' + director)
}
export { movieDirector };How to run a javascript example with Modules?
The program is better structured and it will be easier to make changes.
To finish this example the idea would be to execute the command
- node app-modules.js
But as is too often the case in IT, nothing works as expected.
The previous command will give the following error
- SyntaxError: Cannot use import statement outside a module

How to run a javascript example with Modules?
To make our test work we will proceed as follows:
- Create an index.html file
- Call the script with the type="module" option
- And to perfect it all, let's also add an icon file favicon.ico
Which will give the following file
<!DOCTYPE html>
<html>

<head>
  <meta charset="utf-8">
  <meta name="viewport" content="width=device-width, user-scalable=no">
  <link rel="icon" type="image/x-icon" href="favicon.ico">
  <title>Page Title</title>
</head>

<body>
  <h1>Page content</h1>
  <script type="module" src="app-modules.js"></script>
</body>

</html>
To finish, one last mistake.
If you run index.html in your browser, you will get the following error.
Access to script at 'app-modules.js' from origin 'null' has been blocked by CORS policy
ES6 modules do not work locally.
So let's install an http server.
Node.js will allow us to do this and finally test our javascript program.
# Installer un serveur http
npm install -g httpserver

# Exécuter le serveur, le fichier index.html est utilisé par défaut
http-server -o

# Tester l'application
http://localhost:8080/
If Chrome is your browser use F12 and the console tab to check the display.
- Movie name: Gladiator
- Movie Director: Ridley Scott
As they say, "seeing is believing."
ES6 modules work.
Angular et ngModules
Whether with Javascript or with Angular the same question will arise for us.
The further we develop our application, the more features there will be, and the more difficult it will be to navigate the code.
Angular as a major framework allows for slicing into modules.
The goal is to separate the different functionalities of the application in order to better organize our code.
Angular has its own module management system.
It is called NgModules.
Angular relies on both the ES6 module system as well as its own NgModules system .
We will use the official Angular documentation to understand Modules.
Useful addresses are as follows:
- https://angular.io/guide/architecture-modules
- https://angular.io/guide/ngmodules
- https://angular.io/guide/ngmodule-vs-jsmodule
So Angular has its own module management system.
It is called NgModules.
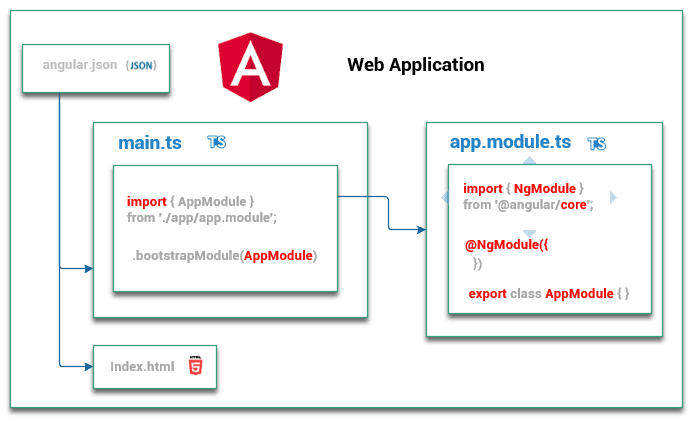
Before going any further, an image will allow us to describe a basic Angular application and the notion of modules.

Let's proceed step by step.
Our basic application has a single entry point.
The main.ts file
This file performs the launching or Bootstrapping of the root module.
This root module is called AppModule.
It is contained in the app.module.ts file
This AppModule uses the Angular library @angular/core which allows it to use the NgModule keyword.
A few remarks to complete all this
- Each Angular Application has at least one module .
- The "root module" is a classic module whose particularity is to define the "root component" of the application via the bootstrap property.
- NgModule is a typescript interface.
In the end we end up with the following source code
- app.module.ts
- main.ts
import { NgModule } from '@angular/core';
@NgModule({
  declarations: [  ],
  bootstrap: [AppComponent]
})
export class AppModule { }import { AppModule } from './app/app.module';
platformBrowserDynamic().bootstrapModule(AppModule)
.catch(err => console.error(err));
The concept of Angular Modules
Now that we have had an overview of Angular and its modules, let's go into details to understand this concept better.
Angular modules therefore represent an essential concept in the way this framework works.
They play a major role in structuring all Angular applications.
Let's start by talking about Angular Module.
- An Angular Module groups together within a single logical unit a certain number of Angular artifacts (or elements).
components, directives, pipes, services.... - An Angular Module defines dependencies to other modules necessary for its own functioning.
- An Angular module is simply defined with a class and the @NgModule decorator.
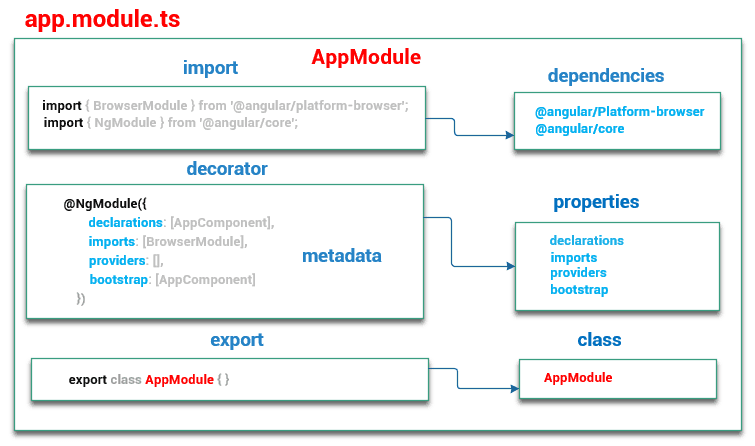
To clear things up, here is a representation of our first module.

An NgModule is a class described by a decorated with @NgModule().
@NgModule() is a function that has a metadata object
These properties describe the module
The @NgModule decorator will allow you to dynamically attach new responsibilities to this class.
It modifies the javascript class by providing metadata to compose new functionalities.
This metadata will therefore allow us to define the responsibilities of the class.
This metadata has properties .
Below is a non-exhaustive list of its properties.
- declarations
Sets the list of items belonging to this module.
These will be for example directives, pipes, components .... - exports
Defines the list of components that will be visible and therefore can be used by modules that import the module.
Undeclared components will therefore be unexported and can only be used by components contained in the module. - imports
Defines the list of module dependencies, i.e. the modules on which our module depends. - providers
This property allows you to declare the services that you will create within this module. - bootstrap
Defines the root component that will contain all the other components of your application.
Only the root module can declare this property.
Shared Module
Code factorization helps organize and streamline our code.
It allows you to group together sequences of identical instructions scattered throughout a program into a single function.
This improves the readability of the code and makes it easier to correct and modify it later.
Angular will allow us to apply factorization by creating shared modules .
Tips from the Angular team can be found at
https://angular.io/guide/sharing-ngmodules
Shared modules will allow us to pool directives, pipes, and components in a single module.
Then we just need to import this module into any part of our application where we need it.
Angular CLI and Modules
Angular CLI stands for Angular Command Line Interface.
Angular CLI is probably the most important tool provided by the Angular Framework.
It will allow you to initialize, develop and maintain your Angular applications.
The commands provided by this tool automatically handle declarations, imports, or bootstrapping.
Angular CLI therefore implicitly adds module management when creating your code.
Now we just have to experiment with the modules.
As we are not going to reinvent the wheel every time
We will obviously use Angular CLI it was made for that.
As the exercises progress, we will see how the principles of the modules are implemented.
This tutorial offers you two scenarios
- A basic application created from scratch
- A prototype application based on Angular CLI , Routing , Lazy loading and Bootstrap Framework
So without further delay, we must move on to practice.
Choose your weapons and take up your battle stations.

Application From scratch
So we're going to create our basic Angular application.
From Scratch meaning we will create it from scratch without any external source code.
It couldn't be more educational!
As we saw previously we will only need two tools
- Node.js
- A code editor
All we have to do now is execute the following commands.
# Installation d'angular-cli dernière version disponible
npm install -g @angular/cli

# Test de version installée
ng --version

# Générer un projet appelé arbitrairement angular-starter avec options par défaut
ng new angular-starter --defaults

# Se positionner dans le projet
cd angular-starter

# Exécuter
ng serve
This is why Angular can be called a Framework .
A few lines of command and the application appears by magic.
It’s “ all in one ”. And quality too!
Now let's analyze the source code generated by Angular CLI.
We will try to find all the elements related to the modules that we have mentioned so far.
Let's start with the app.module.ts file
import { BrowserModule } from '@angular/platform-browser';
import { NgModule } from '@angular/core';

import { AppComponent } from './app.component';

@NgModule({
  declarations: [
    AppComponent
  ],
  imports: [
    BrowserModule
  ],
  providers: [],
  bootstrap: [AppComponent]
})
export class AppModule { }
Let's describe step by step what angular CLI did.
How to create a module?
- export class AppModule
- The module is a class
- It is named AppModule
- It is exported and can therefore be used by other modules
How to describe the features of this module?
- @NgModule ({ .... })
The essential element is the decorator .
It is the @ character that symbolizes the decorator.
The decorator is a design pattern .
It outlines the broad outlines of a solution.
Application Prototype
Now let's use a more extensive application containing a number of features.
To be able to continue this tutorial we need to add a tool
- Git : The version control software.
We will use an existing project whose characteristics are
- Generated with Angular CLI
- Routing
- Lazy loading
- Using the Bootstrap CSS Framework
The commands to use are as follows
# Créez un répertoire demo (le nom est ici arbitraire)
mkdir demo

# Allez dans ce répertoire
cd demo

# Récupérez le code source sur votre poste de travail
git clone https://github.com/ganatan/angular-react-bootstrap

# Allez dans le répertoire qui a été créé
cd angular-react-bootstrap
cd angular

# Exécutez l'installation des dépendances (ou librairies)
npm install

# Exécutez le programme
npm run start

# Vérifiez son fonctionnement en lançant dans votre navigateur la commande
http://localhost:4200/
Tests
# Développement
npm run start
http://localhost:4200/

# Tests
npm run lint
npm run test

# Compilation
npm run build
Code source
By following each of the tips I gave you in this guide you will end up with an Angular source code.
The source code obtained at the end of this tutorial is available on github
https://github.com/ganatan/angular-react-modules
The following steps will get you a prototype application.
- Step 6: Server Side Rendering with Angular
- Step 7: Progressive Web App with Angular
- Step 8: Search Engine Optimization with Angular
- Step 9: HttpClient with Angular
The following steps will help you improve this prototype
This last step allows you to obtain an example application
The source code for this final application is available on GitHub
https://github.com/ganatan/angular-app
How to create a From scratch application?
Create your ganatan account
Download your complete guides for free
Démarrez avec angular CLI 
Gérez le routing 
Appliquez le Lazy loading 
Intégrez Bootstrap 
Utilisez Python avec Angular 
Utilisez Django avec Angular 
Utilisez Flask avec Angular 


